How to Sharpen a Kitchen Knife with a Sharpening Steel Picture Book Directions

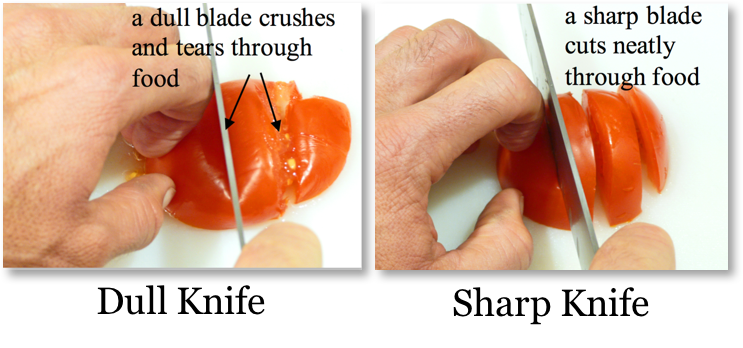
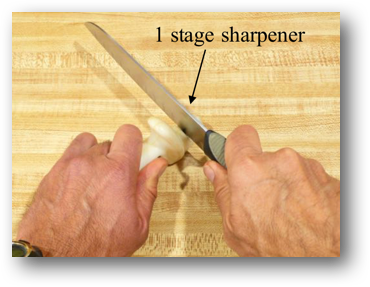
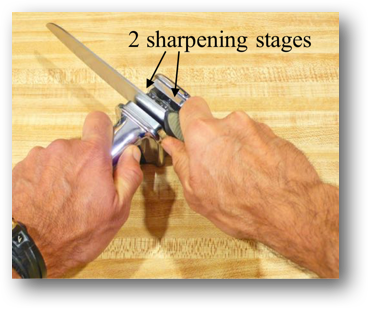
As mentioned in the last post that showed how to sharpen a kitchen knife using a handheld 1 or 2-stage knife sharpener, a dull kitchen knife is the most dangerous piece of equipment in the kitchen. This post shows how to sharpen a kitchen knife safely with a sharpening steel.

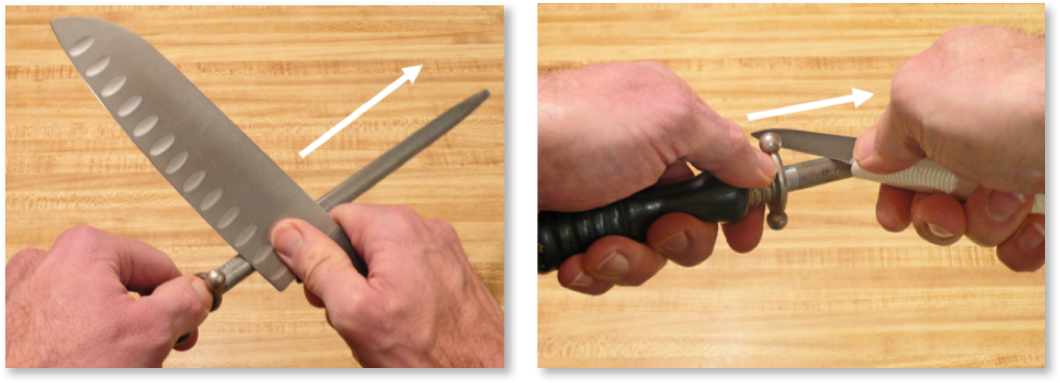
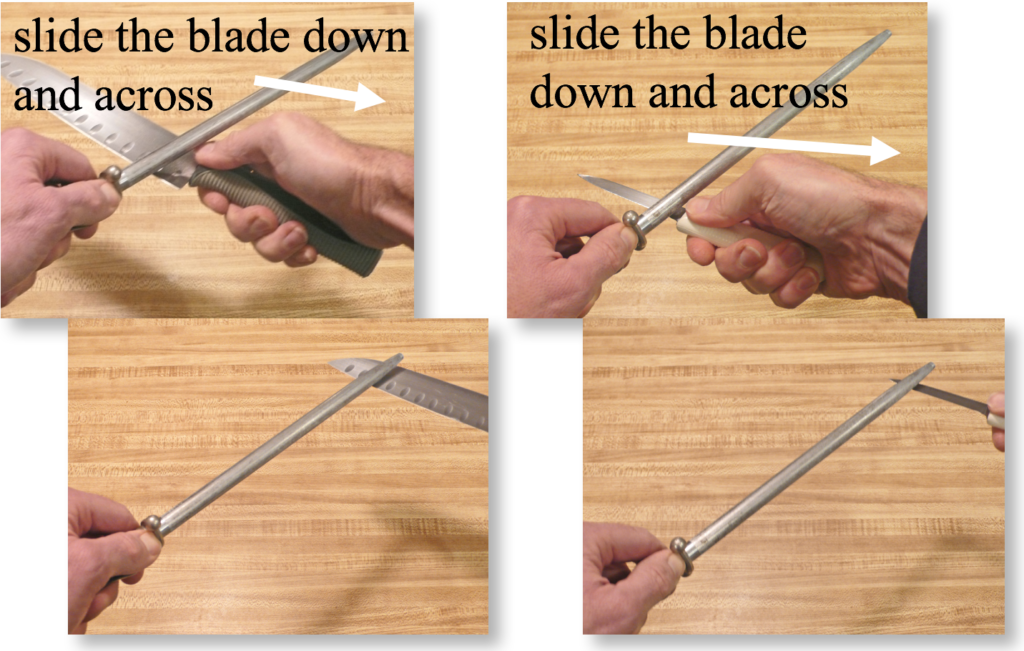
First, the key to using a sharpening steel safely is to slide the knife blade of any size across the steel and away from your body when running the knife both on top of the sharpening steel…

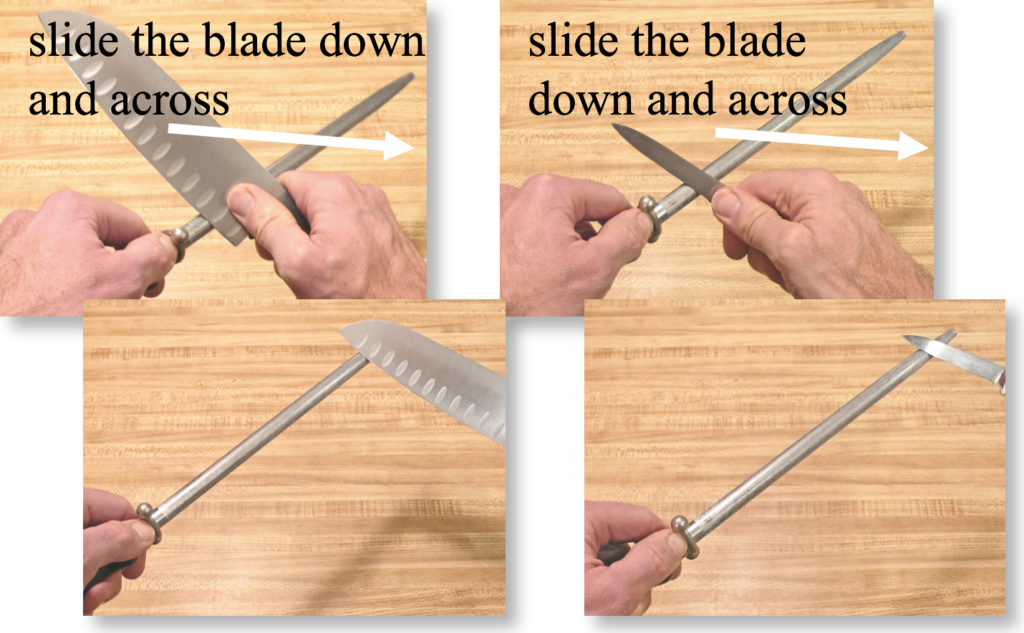
…and bottom of the sharpening steel.

Second, not all sharpening steels are the same. Some of the steels are cut with fine lengthwise grooves while others are diamond dust coated as shown below.

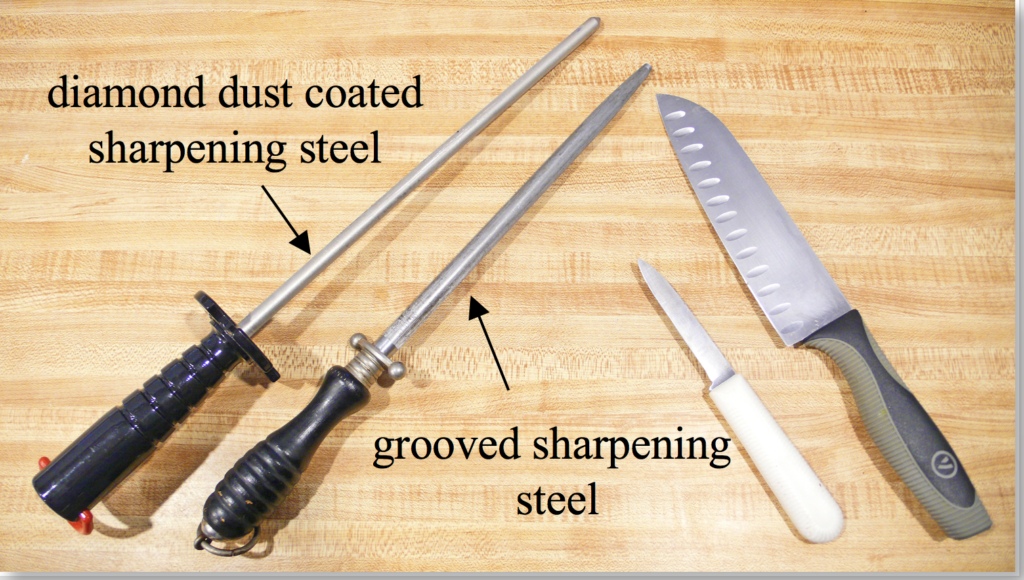
There is a difference in performance. A diamond dust coated sharpening steel can actually help you shape a freshly sharpened knife edge. A grooved sharpening steel will only true/straighten a knife edge that has become curved and bent and, therefore, stops cutting efficiently. A grooved steel will help keep a sharp edge, whereas a diamond coated steel, if used properly, will create a new edge.

Click this link or any picture above for easy-to-follow step-by-step picture book directions that show how to put it all together to sharpen a kitchen knife safely with a sharpening steel.

How to Sharpen a Kitchen Knife with a Handheld Sharpener

Last post showed how to make pasta to perfection. Very shortly, I’ll put together posts that show how to make quick, easy and fully flavorful pasta dishes.

First, though, because those recipes will show how to cut a variety ingredients including, of course, fresh garlic (a must with pasta!), I thought I’d put out some quick posts showing how to sharpen a knife using a either handheld knife sharpener (this post), sharpening steel (next post) and electric sharpener (2 posts from now).

Why make such a big deal about keeping kitchen knives sharp? Because, as far as I’m concerned, a dull knife is the most dangerous piece of kitchen equipment. The reason: unpredictability.

As shown above, a dull knife crushes and tears food because the knife edge can’t set an edge without more-than-needed added downward hand pressure that then makes the knife more likely to slide sideways out of control off what you’re cutting and into your anchoring hand regardless how properly you curl your food gripping fingers. (You bet, this has happened to me.)

Click this link or any picture on this page for picture book directions showing how to sharpen a knife with a 1 stage or…

…2 stage handheld knife sharpener.

Savory Steel Cut Oats with Beans, Avocado & Bell Pepper Picture Book Recipe

Savory Steel Cut Oats with Beans, Avocado & Bell Pepper

Last post showed how to put together a fully-flavorful, energy sustaining sweet one bowl meal with cooked steel cut oats, nut butter, fresh fruit and kefir.  As I mentioned in earlier posts, steel cut oats are richly versatile and can be used to make savory dishes just as well as sweet tasting dishes.

And I know that sounds counterintuitive, “my breakfast oats mixed with savory ingredients – really?”, but it works great!

Here’s an example: Savory Steel Cut Oats with Beans, Avocado & Bell Pepper that combines the full flavor, chew, and potent fiber, complex carbohydrate and protein benefits of steel cut oats and beans with the zesty flavor of vitamin-rich fresh avocado, bell pepper, and cilantro shown below.

Savory Steel Cut Oats with Beans, Avocado & Bell Pepper Ingredients Click this link or any picture on this page for the easy-to-follow picture book recipe, which, as I’ve mentioned before, is for you to use either as is or as a visual guide to improvise with ingredients and flavors to make this savory steel cut oats meal all your own.

Savory Steel Cut Oats with Beans, Avocado & Bell Pepper Picture Book Recipe

Steel Cut Oats with Nut Butter, Fresh Fruit & Kefir Picture Directions

Like I mentioned in the last two posts, steel cut oats are fully flavor and can be used in a wide variety of easy-to-make sweet or savory meals. As a guy living by himself right now, I’m a big fan of what I call one bowl meals.

Here’s a terrific breakfast one bowl meal that combines fully flavorful, highly nutritious cooked steel cut oats, with nut butter, fresh fruit and kefir that, in addition to tasting great, provides full-on, sustained energy whether you’re hopping out to do something physical or just want something satisfying to power you through the morning.

Here’s what I used to put it all together.

What you see above and also below in the recipe you can download by either clicking this link or any picture on this page is only a guide. As always, imagination is your only limit. Recipes like these just provide visual guidelines to help turn your imagination into fully flavorful reality.

How to Cook Steel Cut Oats to Make Them More Easily Digestible, Especially For Those in Phase 1 IBD-AID

First, what is IBD-AID? The first part, IBD, is irritable bowel disorder, which translates in practical terms to a painful gut brought on by inflamed intestines. I’ve had it. It’s uncomfortable and recovery takes – and took me – a long time. AID stands for anti-inflammatory diet, which is a richly vibrant diet to live by, sure, to ease IBD, but also to improve digestion and promote a better quality of life overall for everyone. Here’s a chart from UMass Medical School’s Center for Applied Nutrition that highlights foods that promote good digestion.

You probably noticed that steel cut oats are right at the top of the prebiotic food list. Prebiotics are foods that helpful bacteria, or probiotics, in your gut need to eat to stay alive. Keeping those helpful bacteria properly fed, alive and well is exactly what makes for good digestion and helping you feel your best, especially considering that there are many times more bacteria than your own cells in your body.

Personally, once I learned about it, I’ve stuck to an anti-inflammatory diet for decades and absolutely love it for how much better my gut feels as well as for its full-on flavor and variety. Like I write here all the time, flavor rules(!) and no diet, which only means a method of food selection, ever has any chance of working successfully without flavors that taste good.

Click this link or either picture at the top and bottom of this page to learn more about steel cut oats and how to cook them to make them more easily digestible for IBD purposes or otherwise. You can also click this link for more AID specific recipes on this site.

Stove Cooked Steel Cut Oats Picture Book Directions

Steel cut oats: great stuff – for lots of reasons!

First, taste – and tastes always rules! Steel cut oats have a rich, nutty flavor and taste great in both sweet and savory dishes – I’ll show examples in future posts.  

At the same time, they are both a complete protein source and a complex carbohydrate, which makes them ideal for sustained, not spike and drop, energy, like the kind of energy you need for a good run, bike ride, hike or just to get through a long work day.  They’re also rich in fiber and anti-inflammatory (next post will show how to cook steel cut oats to accommodate people on the first phase of a diet intended to relieve IBD).

Here’s how rolled oats (left) look compared to steel cut oats (right).

Rolled Oats and Steel Cut Oats Comparison

The big difference between the two is pre-processing. Unlike rolled oats, which are hulled, pre-cooked and then flattened by heavy rollers to allow for quicker home cooking, steel cut oats are not hulled or precooked, which allows the same oat grain to retain more of its nutrition and flavor.

To learn more about steel cut oats and how to cook them as easily as possible – just 25 minutes on the stove almost all hands-free, just click this link or any picture on this page for complete, easy-to-follow step-by-step picture book directions.

How to Take Scrambled Pancakes From Simple to Exciting!

Last post showed how to make scrambled pancakes, which are really just modified scrambled eggs with pumped up flavor (flavor rules!) and nutrition.

This post shows how to take those scrambled pancakes from simple to exciting…

…using only “commonly” found ingredients, like those shown below. I put commonly in parentheses because ingredients that might be common to me – or anyone else in particular – might not be common to you. As always, what you see below are only suggestions to stir up your imagination and give you a sense of technique. Use any added ingredients you want to take your scrambled pancakes from simple to exciting.

With your portion of scrambled pancakes in a bowl either fresh off the stove or warmed in the microwave oven, start topping with a good spoonful of peanut, almond or any nut butter (to make your own in advance, click this link), a good spoon of jam (honey or maple syrup), and 1-2 tablespoons of yogurt (I like non-fat Greek yogurt for its flavor and potent protein content).

Add your choice of quickly rinsed fresh fruit. I’m using pitted fresh cherries (in the winter, from Chile – killer flavor and crisp crunch!) and blueberries.

Add any dried fruit – optional but something I always do. I’m using chopped dried dates, but you can substitute with raisins, dried cranberries, dried prunes – you get the idea.

Finish off with a good shot of kefir, whipped cream or anything you like.

And that is all there is to taking easy, completely improvised scrambled pancakes from simple to exciting, also by improvising to satisfy your drive for full on flavor.

As I mentioned in the last post, that you see above just as is powered me through the 40 mile bike ride shown below at a decent pace – no problem at all, except for keeping up with Josh, Greg and hammer-fast Juan.

Scrambled Pancake Picture Directions

The other day I wanted something a little different for breakfast with flavor and substance to power me through a good late winter Hickory, NC, group bike ride. Here’s what I came up with. I call it scrambled pancake because I used most of the ingredients I use to make a fruit pancake but scrambled the batter like scrambled eggs.

These are the ingredients that I mixed in the bowl you see at the bottom of the picture below.

Those ingredients and rough proportions are (no need to measure precisely: with these ingredients, your result will turn out great): 2 eggs, dash of salt, good shake of ground cinnamon, about 1 teaspoon vanilla extract, 1 big tablespoon of each: ground flaxseed, cooked quinoa (the red grains in the square container above the butter), cooked steel cut oats (the white grains in the square container between the vanilla extract), and a handful of raisins.

Of course, as an improvised recipe, which is just a guide, and I was using what I already had in the fridge, specifically regarding the quinoa and steel cut oats. I can imagine you don’t have those – and possibly not ground flaxseed also – ready to grab and go. No problem: just substitute any or all the grains above with any favorite cooked or ready to eat grain, like cold oat cereal, granola or wheat germ. Your imagination is your only limit.

Here’s how to cook what you’ve mixed.

Add about as much butter as you see above to a frying pan warmed to the same temperature needed to make scrambled or fried eggs. Add and spread the batter, and give the pan a good back and forth shuffle like you see in the last picture above to “encourage” the batter not to stick to the pan surface.

After a 1-3 minutes, when the bottom of the cooked batter looks lightly browned like the top photo above, use a spatula to turn the batter. Don’t worry about trying to turn it all in one piece. (I tried doing that myself – and failed with a smile). Then use the spatula to break and turn the batter, like you would do to make scrambled eggs, until it is cooked through as shown below.

You can then scoop what you’ve cooked into a bowl and add whatever you want want: maple syrup, honey, jam, peanut or any nut butter, yogurt, whipped cream – anything. Next post, I’ll show what I added to make what you see below that easily sustained me for 40 miles on the bike, no problem.

More very soon!

Cacao Coffee & Whipped Cream

This piece is really about improvising on the fly to meet the flavor you want at a particular time. Here’s an example. This morning I woke up wanting some chocolate in my coffee. I love those two flavors together – and wanted to brew them together as easily as possible.

I pulled these three ingredients together – easy: cacao powder (you can substitute that with cocoa powder – the two are quite different), sugar (I’m using coconut sugar, but any sugar will work) and salt.

To make 4 “cups” of cacao coffee (4 cups = 12 ounces of coffee in my coffee machine), I added 1 piled teaspoon of cacao powder, 1 teaspoon sugar and a dash of salt directly into the coffee carafe.

I put the carafe in the coffee maker and brewed. For added help to make freshly brewed coffee, click this link for easy to follow “Great Coffee Made Easy” picture book directions.

When the coffee was just about done brewing, I mixed equal parts half and half and coconut water and warmed them for 50 seconds in the microwave oven. (I added coconut water for just a bit of added flavor and added potassium to prep for a good crunch on the bike.)

As soon as the coffee finished brewing, I stirred the cacao mix, poured the hot cacao coffee to together with the freshly warmed half and half and coconut water, and…

…added a good shot of freshly made whipped cream, which you can learn how to make very easily by clicking this link.

Next post: what I ate with the cacao coffee to ride 40 miles at a good pace without feeling hungry at all along the way.

Food Brings People Together: Apple Cherry Pancake

Food sure does bring people together, and I’ve had a lot of fun sharing what you can find on this site with new friends I’ve made since moving to Hickory, NC, last summer.

Yesterday, I made the apple cherry pancake you see below for a terrifically outgoing, warm and welcoming husband and wife who both have introduced me to Hickory’s richly grounded spiritual life and have become good friends.

Improvised apple cherry pancake – that you can make easily!

You won’t find the exact recipe for the pancake you see above because I improvised it on the fly based on fresh fruits I had on hand: fresh opal apples from Trader Joe’s and fantastically flavorful fresh Chilean dark cherries from Aldi’s shown on the cutting board below.

Improvised apple cherry pancake ingredients ready for the warm frying pan

I can very well understand that you might think tackling an improvised recipe might be a stretch after having seen the preceding two very quick & easy Instant Hot Cereal recipes, but that is not the case at all – and I’ll help you with picture book guidance every step of the way. Just click this link or any picture on this page for the Fresh Apple Pancake recipe and substitute or complement the apples with your favorite fruit.

Fresh Apple Pancake picture book recipe

Most importantly, think only of making it turn out successfully – and it will -and then enjoy the terrifically satisfying warm flavor you create either for yourself or to share with friends!

Designed by Free Wordpress Themes and Sponsored by Curry and Spice